

Tottenham Hotspur's Opening-Day Lesson: The Rest-Defense Rift That Brentford Exploited
The headlines will frame it as Tottenham Hotspur floundering and Brentford flourishing. The real story is simpler and more surgical: Brentford did not just beat Spurs; they cut directly through a structural gap in Tottenham’s rest defense that has been visible for more than a season, then amplified by the opening-day volatility of a high-tempo Premier League fixture.
Let’s be clear from the first whistle: tactically speaking, this wasn’t about desire or mentality. Spurs set up to dominate the ball, push a high line, and flow into a 2-3-5 with wingers pinning the touchlines and an attacking midfield triangle shifting across the final third. It was coherent in theory. But the total shape only works if the team’s insurance policy—the players left behind the ball to secure counterpresses and absorb transitions—is timed and spaced with meticulous precision.
Brentford found the imprecision. Over and over, they triggered Tottenham’s press, then vaulted the first pressure line into the vacated channels between centre-backs and the single pivot. The upshot: repeatable access to the spaces you’re supposed to keep secure when you attack. That is the story, and—if Spurs don’t adjust—that will be the season-long subplot opponents keep targeting.
In our view: Spurs didn’t lose because they’re naive; they lost because their spacing made naivety inevitable. A brave 2-3-5 becomes brittle the moment the rest-defense triangle opens by even five metres.
What Happened: The Press Worked—Until It Didn’t
Tottenham sought early control with assertive pressure on Brentford’s centre-backs. The triggers were classic: a centre-back receiving on the back foot, a square pass into the pivot, a touch facing his own goal. Spurs surged on those cues, seeking touchline traps and back-pass turnovers. In the first ten minutes, that produced a couple of rushed clearances and one promising regain near the right half-space.
But Brentford are too sophisticated to play into a single pressing script. They inverted their full-back at times to create a back-three, then dropped their near-side winger into the half-space to receive on the half-turn. The core aim was to draw Tottenham’s near 8 into a gamble: step to the ball and leave the pivot zone, or sit and concede time. When Spurs stepped, Brentford used third-man runs to leapfrog pressure; when Spurs sat, Brentford advanced without duress and then hit diagonals against the high line.
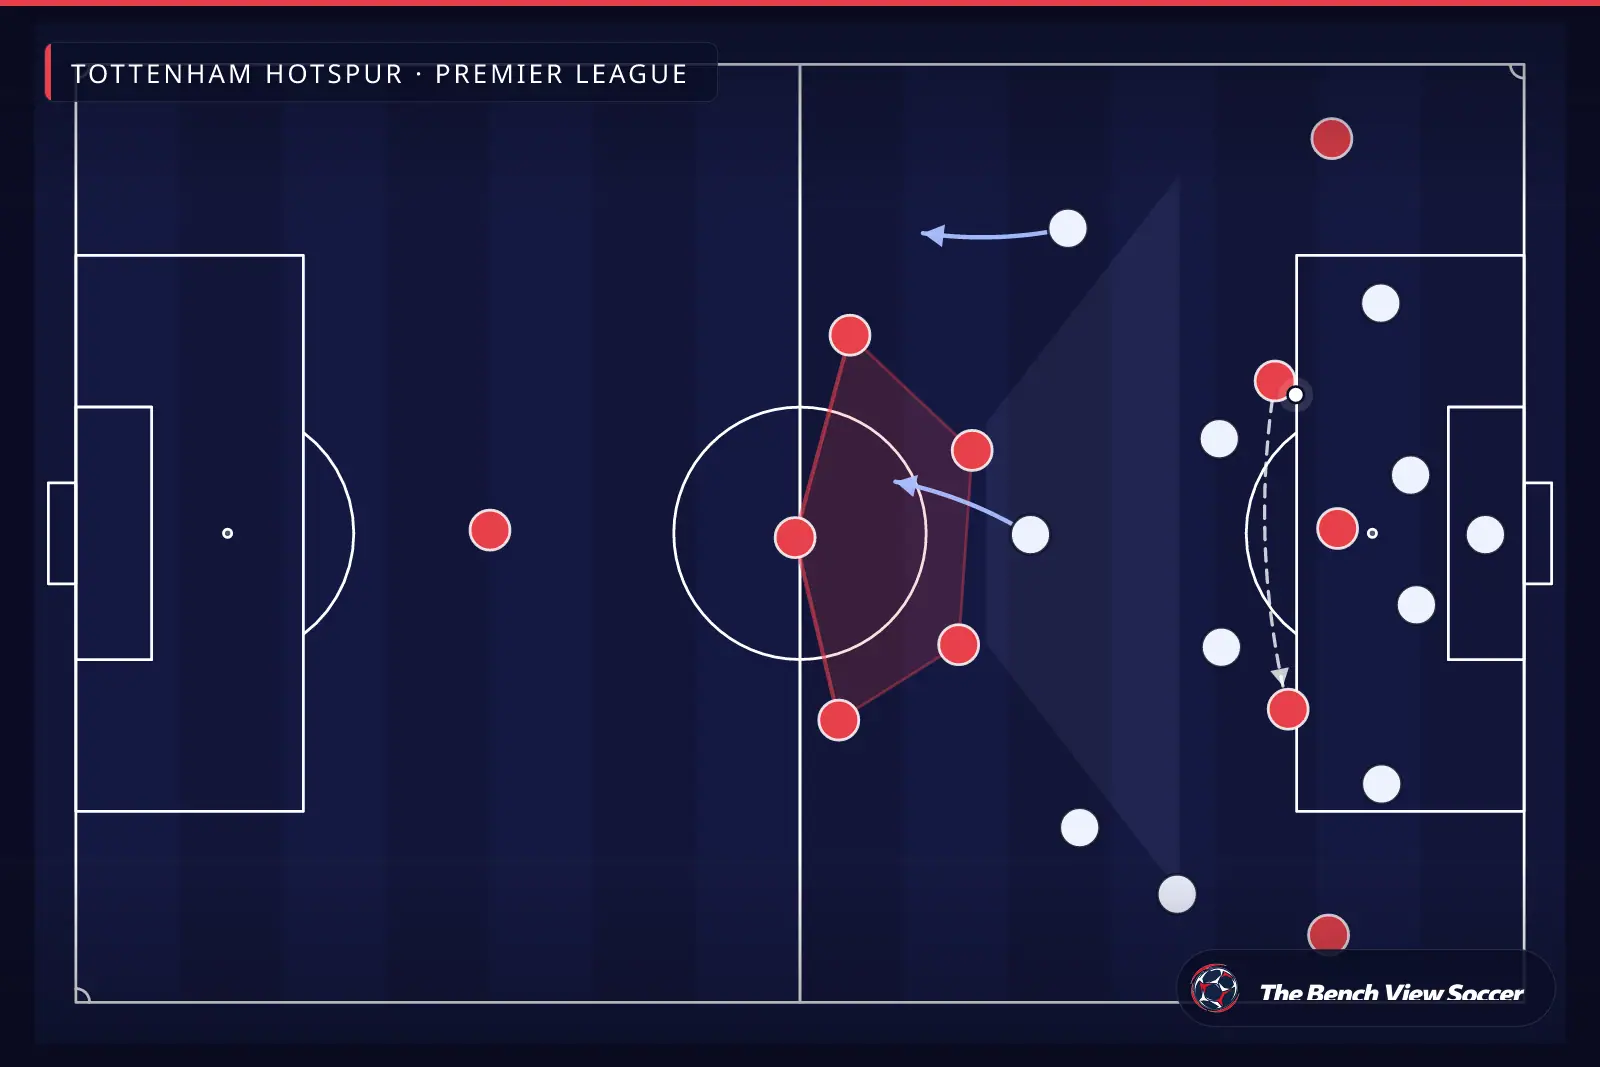
The moment that crystallized it came late in the first half. Spurs’ left winger pressed inside, the left-back underlapped to cover the channel, and the single pivot shuffled across toward the ball. One quick bounce pass into the inside channel and Brentford released a runner into open grass. That sequence did not require magic; it required a structural fault: Spurs’ two centre-backs were marooned 2v2, the pivot too far to influence the first duel, and the far full-back high and wide. A long, straight sprint decided it.
The Structural Faultline: A 2-3-5 Without a Safety Net
In possession, Tottenham’s idea remains bold and modern. You saw the lines: two centre-backs anchoring the rest-defense, a midfield line of three (often a single pivot plus two high full-backs or an inverted full-back and one high), and then a front five to create positional superiority across the width of the pitch. Spurs routinely arrived in the final third with numbers, often manipulating Brentford’s last line to open a central lane for the No. 9’s feet or an out-to-in run from the far winger.
Yet the risk calculus of that structure hinges on one non-negotiable: the vertical distance between the deepest midfielder and the centre-backs must be short enough to collapse on the first counter touch. When that gap stretches beyond ~20 metres, the pivot’s first action becomes a recovery run rather than a challenge. Brentford repeatedly tilted Spurs into that worst-case geometry by sucking the pivot laterally and then resetting the ball centrally with one diagonal.
Two additional micro-details made the gap yawning:
- Spurs’ advanced full-back on the far side was often positioned level with the front five, not staggered five to seven metres behind to give diagonal cover. That flattened the 3 in the 2-3-5 into more of a 2-2-6 at moments of negative transition.
- The near No. 8 regularly jumped out of the midfield line to attack a back-press opportunity on Brentford’s 6. That’s good pressing instinct—but it must be mirrored by a chain reaction: the pivot slides into the space vacated, the far 8 tucks to protect, and the far winger narrows. Spurs were a beat slow on that rotation. Brentford needed only that beat.
Pressing Triggers and the Cost of Being Half-Right
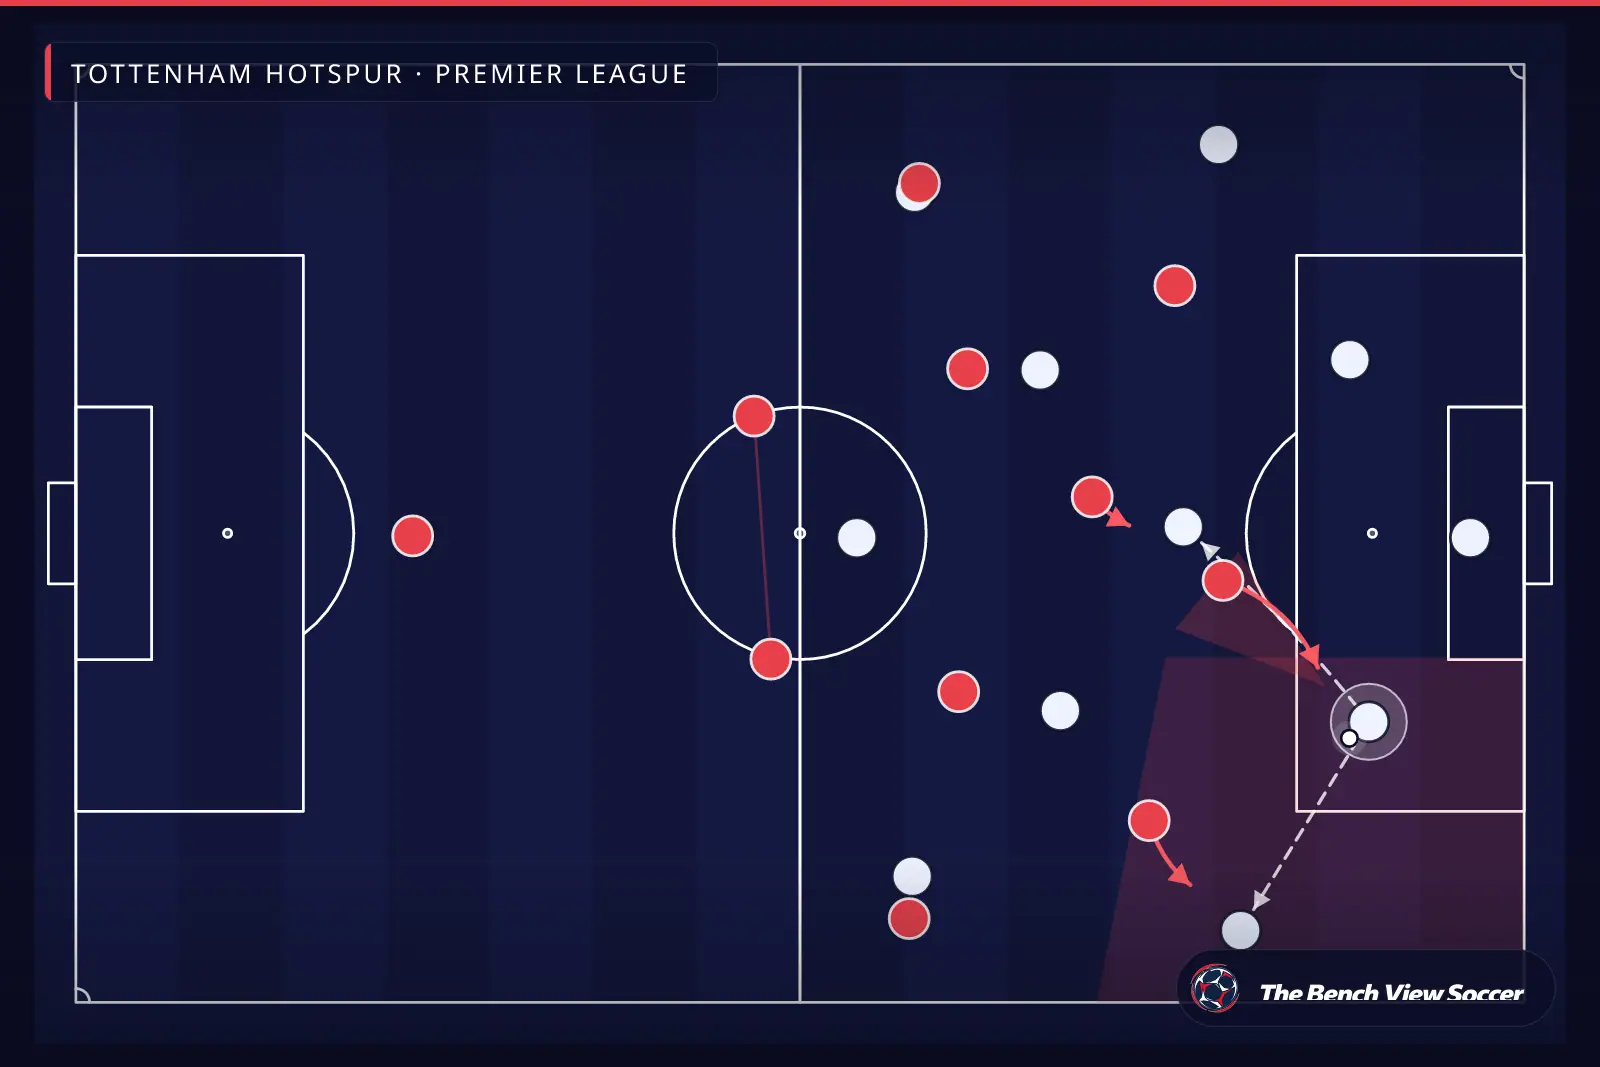
Tottenham’s pressing cues were not the problem; the spacing behind them was. When Spurs pressed to the touchline, the body shapes were aggressive and well-drilled. But every press is a wager, and the hedge is what sits behind the ball. Brentford’s out-ball under pressure was almost always a lobbed diagonal into the corridor of uncertainty between Spurs’ right centre-back and overlapping full-back on that flank. One flicked header, one cushioned lay-off, and they were running downhill.
The opening phase of the second half underlined this. Tottenham started on the front foot, stacking numbers on the left to bait Brentford into the press. As the trap shut, a chipped escape into the far channel created a straight 40-yard sprint. That sprint is a referendum on your rest-defense distances. Spurs lost too many of those referendums.
Ball Progression: When Five Up Top Isn’t Really Five
There’s a second-order effect that compounded Tottenham’s issues: their own attacking spacing blunted their ability to slow the counter. Paradoxically, the wider the wingers pinned Brentford’s full-backs, the more isolated Spurs’ central striker became in linking play. The team’s best progression often came via an inside lane to the No. 10, bouncing to a full-back on the underlap, then released to the winger attacking the seam. But Brentford tilted their block to remove that inside-out rhythm and force Spurs to play along the touchline.
Playing to the flank is not a problem if the ball-side 8, the winger, and the overlapping full-back are arranged on three different vertical lines. Too often, Spurs’ winger and full-back ended up on the same line, enabling Brentford to defend two players with one cover shadow. When Tottenham lost the ball from those positions, the first pass of the counter was not pressured horizontally; it was a vertical gut-punch past an isolated pivot.
When Spurs did find the interior lane—particularly during a 10-minute spell after the interval—their best moment arrived as the No. 10 received between lines in the right half-space, slipped a diagonal into the striker’s path, and dragged three Brentford defenders into the width of the box. The move fizzled at the final action, but the pattern matters: Tottenham are closer to fluency when the ball arrives centrally before it goes wide, not vice versa. That isn’t stylistic preference; it’s structural protection. If you lose it centrally with proper rest-defense shape, you collapse onto the ball. If you lose it on the flank while your 3 is flat, you’re facing your own goal.
Set-Pieces and Second Balls: The Hidden Battle Spurs Lost
Brentford have long been elite at scripting restarts and winning the mess that follows. Tottenham knew it, but knowing is not the same as controlling. The margin here came not from the first contact but the second. When Spurs cleared the initial ball, Brentford were consistently first to the knockdown on the edge of the box. Why? Because Tottenham’s zonal line drifted too deep under pressure, creating a no-man’s land at 16 to 22 metres from goal where the visitors placed their collectors.
This matters beyond set-pieces. The same second-ball pattern recurred in open play. When Spurs’ near centre-back stepped out to contest a long ball, the nearest midfielder was often late to form the double screen. Brentford’s forwards are coached to contest the first duel not to win it cleanly, but to make the ball drop in pre-mapped areas. You could see that choreography: Spurs met the first ball; Brentford won the second. The second is what ignites controlled counters.
Historical Echoes: We’ve Seen Versions of This Spurs Before
Tottenham’s high-wire act is not new. In the early part of a prior campaign, we saw the same promise and peril. Matches where Spurs dominated territory but conceded big chances in small numbers—each born from a transition where the distances behind the ball were stretched, the full-back was marooned high, and the pivot couldn’t compress the space in time. It echoed those chaotic nights when a red card didn’t break Spurs’ will but distorted their spacing, and opponents feasted on counters into a high line. Even back in the days when Spurs were retooling their identity after a managerial change, the same tactical question hung in the air: how do you play front-foot, five-lane football without giving the game away in the gaps?
We’re not rewriting that history here; we’re contextualizing it. Tottenham have already shown that the underlying idea—overloads into a front five, aggressive counterpressing, and vertical passing—can overwhelm most mid-blocks. But they’ve also shown that specific Premier League opponents with directness, wing running power, and scripted escapes will turn that bravery into exposure unless Spurs alter the risk profile when the ball is lost.
Cause and Effect: Why This Keeps Happening
Strip the emotion away and you get a clean chain reaction:
1) Spurs build with a 2-3-5, aiming for five-on-five across the front line and a rotating three behind to secure rest-defense.
2) The near 8 presses out or the near full-back underlaps to create an overload. The single pivot shifts laterally to connect.
3) Ball is lost on the flank or centrally after a compressed combination. At the instant of loss, the pivot is outside the centre-backs’ cover shadow and the far full-back is high.
4) Brentford play the first counter pass vertically into the channel. Spurs’ centre-backs turn and run, facing their own goal, with a 2v2 or a 3v3 developing at high speed.
5) Even if Spurs recover on the first run, the second ball—off a deflection or challenge—falls into acres because the midfield line hadn’t re-formed. Brentford collect, recycle, and shoot before Spurs can reset.
This is not about effort or personality. It’s geometry and timing. The five-on-five up top gives you a puncher’s chance to score; the thin rest-defense gives the opponent one, too. The problem today was the opponent’s plan better controlled where and when those punches were thrown.
The Fixes: How Spurs Can Close the Gap Without Killing Their Identity
The best managers don’t abandon principles after a loss; they re-tune the levers. Tottenham have at least seven levers to pull immediately—none of which compromise the philosophy:
1) Stagger the Back of the 2-3-5
Stop flattening the three behind the ball. Keep the far full-back or far 8 five to seven metres deeper to build a diagonal cover shadow behind the pivot. This preserves the passing options on the ball-side while subtly forming a double pivot in moments of risk. You’d still read it as a 2-3-5 in attack, but it would morph into a 3-2 when possession is unstable.
2) Pre-Assign the Counterpress Roles
Right now, Spurs counterpress reactively, with the nearest player taking the first challenge. Script it: if the ball is lost on the left touchline, the left 8 attacks the carrier, the pivot screens the square pass, the left-back marks the inside runner, and the near winger jumps the return to the full-back. Clockwork beats chaos, especially against teams that map their counters as carefully as Brentford do.
3) Rotate the Pivot Earlier
When the near 8 jumps, the pivot must start moving two touches earlier, not on the loss. That is a coaching point, not an athletic trait. It means reading the likelihood of a turnover and shading the spacing closer to the centre-backs. You forfeit a passing angle in exchange for security. The trade-off is worth it in matches where the opponent’s direct runners are your biggest threat.
4) Flip the Winger-Full-Back Relationship
Spurs love their wide winger and underlapping full-back patterns. Brentford anticipated them. Try flipping it for phases: keep the winger narrower in the half-space and push the full-back high and wide. This complicates Brentford’s cover shadows and forces their wide midfielder to turn and defend towards his own goal. It also means that if you lose the ball, your winger is in a central counterpress lane rather than a touchline dead-end.
5) Use the 10 as a Backward Presser
Assign the No. 10 to hunt the first receiver on counters from behind. It’s a small tweak with an outsized impact. The 10’s run back through the ball-line buys the pivot a second to set, nudges the carrier wide, and funnels the counter into your covering centre-back instead of straight at goal.
6) Change the Pressing Height in 10-Minute Blocks
Brentford are brilliant at turning your eagerness against you. Dial the line back by five metres in pre-planned segments to make their first pass longer and their second ball harder to control. The aim isn’t to bunker; it’s to create mixed pictures. Purely predictable pressing is solvable; patterned variety creeps into their muscle memory and makes solving you harder.
7) Set-Piece Cage for Seconds
On defensive set-pieces, keep one extra player at the D not as a luxury but as a necessity. Trust your near-post and central zonal markers to contest the first ball; invest in the zone where Brentford are gambling for rebounds. That one player cuts their high-value reloads by half.
Why Brentford’s Plan Was So Effective
Credit where due. Brentford didn't randomly stumble upon Tottenham’s gaps; they walked to them with intention. Their out-of-possession shape flexed between a mid-block 4-3-3 and a slightly asymmetrical 4-4-2, with the weak-side winger tucking to screen Tottenham’s inverted full-back when present. When Spurs built to the left, Brentford over-shifted, leaving bait on the far side and daring Spurs to take the lateral switch they had already primed to attack.
In possession, Brentford’s best counters were not 70-yard epics; they were 25-yard sprints that began from winning the second ball. They emphasized directness: a first vertical pass to fix the centre-backs, a lay-off to the runner in the right half-space, then a ball rolled into the blind-side channel for a cutback. You saw variations of the same grammar again and again. Tottenham defended the first sentence; Brentford wrote the paragraph.
Comparative Context: Big Sides, Same Problem
Spurs are not alone here. We’ve watched top European sides live with the same edge. Think of those nights when elite, front-foot teams gave up the exact chance profile Tottenham conceded here: few shots allowed, but a disproportionate share of them being high-value, straight-line transition looks. The overarching lesson from those clubs has been consistent: don’t abandon the high line; adjust the staging in front of it. The back four looks reckless when the midfield in front isn’t layered. Add a layer, and the same high line becomes suffocating rather than suicidal.
The corrective playbook is clear because many have already written it. Spurs need to apply their own edition to the Premier League’s particular chaos.
What It Means for Tottenham’s Season
Opening day doesn’t define a campaign, but it can reveal the problem opponents will probe until you fix it. Here’s the season’s fork in the road, framed tactically:
- If Spurs keep the 2-3-5 but tighten the distances, they’ll retain their territorial dominance and impose a front-foot identity that wins most domestic matches against passive mid-blocks.
- If they keep the current spacing, high-tempo sides with direct runners and well-rehearsed counters will drag them into shootouts decided by sprints, not schemes. The Premier League has enough of those opponents to make the variance punishing.
- If they overcorrect and drop the line or the ambition, they’ll fix the counter, but they’ll also dull the attacking edge that makes this project exciting—and they’ll concede the initiative that is supposed to be their hallmark.
So the solution must be principled pragmatism: keep the ball-dominant approach, but build a better trampoline to bounce back when possession breaks.
Players and Profiles: The Traits That Matter
Rather than naming names, let’s talk attributes, because the attributes will decide the ceiling:
- The pivot must be a scanner first and a passer second in matches like this. That means anticipating where the turnover might occur and cheating his position closer to the centre-backs when the combination on the flank becomes crowded.
- The far full-back needs to be a cover specialist, not just an overlap merchant. His first three steps backward matter more than his first three forward when the opponent’s threat is direct pace.
- The 10 has to relish backward pressing. The difference between a clean through-ball and a deflected counter is often the 10’s tackle from behind that slants the run.
- The centre-backs must be comfortable defending big spaces, but more importantly, comfortable making early decisions—step to challenge the first ball or drop to protect the space—without hesitation. The indecision is the killer, not the line height per se.
Counterargument: Is This Just Opening-Day Noise?
Let’s be fair. The first match of the season is a small sample drenched in adrenaline. Players’ timing is 5% off, legs are fresh enough to run forever, and game-states turn weird. You can argue that Spurs actually controlled long stretches, created enough to keep a typical opponent under the cosh, and were undone by a handful of high-variance moments. On another day, an early Tottenham goal rewards the press, Brentford must open up, and the same 2-3-5 pins them in for an hour.
There’s also the point that Brentford are a stylistic bad matchup—one of the league’s best at direct play, second balls, and pre-planned escapes. Most teams won’t replicate that precision, and Spurs will face plenty of mid-blocks that can’t spring those traps as effectively.
All of that is true. And still, the structural point remains: the problem is portable. If you leave a vertical crevasse behind your midfield and keep your far full-back flat with the front five, any well-coached side with speed and a first-pass outlet can hurt you. Fix that, and the variance tips back your way. Ignore it, and even lesser sides will find enough transitions to make matches coin-flips.
What to Watch Next: Diagnostic Metrics and Pictures
Forget the noise and watch these pictures over the next month:
- Does the far full-back or far 8 habitually sit five metres deeper when Spurs attack to form a sturdier rest-defense line?
- When the near 8 presses the pivot, does the single pivot slide early enough to fill the vacated space—and does the far winger narrow to join the counterpress diamond?
- After turnovers on the flank, does the 10 sprint backward to attack the first receiver, or does he hang for the next attack? The former turns fast breaks into slow build-ups. The latter leaves the centre-backs in a footrace.
- On set-pieces, does Tottenham keep an extra player at the D to contest second balls? You’ll feel the change in the flow of those chaotic five-second windows.
- Line height oscillation: are Spurs pre-programming five-to-ten-minute windows of slightly deeper pressure to dislocate the opponent’s rhythm?
Final Word: Principles Intact, Parameters Adjusted
Tottenham should not flinch from their plan. The front-foot, five-lane approach is what makes them dangerous and, frankly, fun. The solution isn’t to temper belief; it’s to tune the distances and the roles that underpin it. Give the pressing triggers a sturdier scaffold. Create one more layer in front of the high line. Flip one wide relationship per half to vary the look. Protect the second ball like it’s worth half a goal—because against teams like Brentford, it nearly is.
If Tottenham make those tweaks, they’ll keep the upsides of their identity while blunting the edges opponents have been exploiting. If they don’t, this won’t be the last time a savvy, direct side runs through the same door.
Our verdict is blunt because the evidence is, too: keep the courage, fix the coverage.
The Bench View app
Don’t just read football — train it
Everything you read here, turned into training you can follow step by step.
Physical training at home
AI daily sessions adapted to your level and position. No equipment needed.
Tactical training courses
Step-by-step courses on positioning, pressing, build-up and decision making.
- 7 days free
- No commitment
- Cancel anytime
Free account: 2 physical sessions + the first tactical course. PRO: 7-day free trial — cancel before day 8 and you pay nothing.
More Analysis
Tottenham Hotspur: How World Cup 2026 Is Warping Their Press
August 27, 2026
Chelsea's 3-2-5 Rest-Defense Is the Real Champions League Edge
August 27, 2026
Aston Villa's Box Midfield Is the Premier League's Real Edge
August 26, 2026
Chelsea's Box Midfield Is Fueling Chaos at the Cottage — Why
August 24, 2026